15 Charming Teacup Crafts You Can Make at Home
This post may contain affiliate links. Please see my disclosure policy for details.
There’s something a little magical about old teacups. Maybe it’s the delicate patterns, the tiny handles, or the way even a mismatched thrift-store find can feel special.
I’ve always thought teacups were too pretty to hide in the back of a cabinet, especially when one gets chipped, loses its saucer, or no longer fits the rest of the set.
That’s what makes them perfect for teacup crafts. They’re small, lovely, easy to style, and just right for creative projects that add charm to your home. In this guide, you’ll find DIY teacup ideas that are simple enough for beginners but still feel thoughtful and beautiful.
Whether you love vintage teacup crafts, cozy teacup decor, or clever teacup gift ideas, these upcycled teacup projects are a wonderful way to give old pieces a second life.
1. Teacup Candle
A teacup candle is one of the easiest and prettiest ways to repurpose an old cup. It feels cozy, looks lovely on a shelf or bedside table, and makes a sweet handmade gift.
Basic supplies needed
- Teacup
- Candle wax flakes or old wax
- Wick
- Wick sticker or hot glue
- Fragrance oil, optional
- Double boiler or heat-safe container
Simple step-by-step directions
- Clean and dry your teacup well.
- Secure the wick in the center of the cup.
- Melt the wax slowly using a double boiler.
- Add fragrance oil if you want a scented candle.
- Pour the wax into the teacup and hold the wick upright.
- Let the wax cool and harden completely before trimming the wick.
Make-it-extra tip
Tie ribbon around the handle and pair it with matches for one of the easiest teacup gift ideas you can make.
2. Mini Succulent Planter
If you want low-maintenance teacup decor, this one is hard to beat. A tiny succulent tucked into a floral cup looks charming on a windowsill, desk, or bathroom shelf.
Basic supplies needed
- Teacup
- Small stones or pebbles
- Cactus or succulent potting mix
- Mini succulent
- Spoon
Simple step-by-step directions
- Add a layer of small stones to the bottom of the cup.
- Spoon in a little potting mix.
- Gently place the succulent inside.
- Add more soil around the roots.
- Pat it lightly into place and water sparingly.
Make-it-extra tip
Use a teacup with gold trim or a delicate rose pattern for a soft vintage look that feels right at home in vintage teacup crafts.
3. Teacup Bird Feeder
This is one of those DIY teacup ideas that looks straight out of a garden fairytale. A teacup bird feeder can hang from a branch or sit on a garden post.
Basic supplies needed
- Teacup and saucer
- Strong outdoor glue
- Twine, chain, or garden stake
- Birdseed
Simple step-by-step directions
- Glue the teacup to the saucer at a slight angle or upright.
- Let the glue cure fully according to package directions.
- Attach twine or chain if you want to hang it.
- Fill with birdseed.
- Place it in your yard or garden.
Make-it-extra tip
Choose bright floral china so the feeder doubles as eye-catching outdoor teacup decor.
4. Fairy Garden Teacup
This project is tiny, whimsical, and honestly hard not to love. A fairy garden teacup is perfect if you enjoy miniature scenes and cozy little details.
Basic supplies needed
- Teacup
- Potting soil (optional)
- Moss
- Small pebbles/Gravel
- Mini fairy garden accessories
- Tiny plants or faux greenery
Simple step-by-step directions
- Fill the teacup with soil, gravel, or floral foam.
- Add moss or gravel as your base layer.
- Tuck in tiny plants, pebbles, and miniature decorations.
- Arrange everything until it looks like a tiny garden world.
- Display it indoors or in a sheltered outdoor spot.
Make-it-extra tip
Add a tiny bench, mushroom, or pebble path to give your scene more storybook charm.
5. Teacup Pin Cushion
This is such a clever craft if you sew, quilt, or know someone who does. It’s practical, pretty, and one of the most classic upcycled teacup projects.
Basic supplies needed
- Teacup
- Fabric scrap
- Stuffing or batting
- Needle and thread or glue
- Decorations: Ribbon, lace, pearls, optional
Simple step-by-step directions
- Cut a circle of fabric slightly larger than the top of the cup.
- Fill the center with stuffing.
- Gather the fabric into a puff shape and secure it.
- Glue or press the cushion into the teacup.
- Let it set before using.
Make-it-extra tip
Use vintage floral fabric that picks up a color in the teacup pattern for a polished, gift-worthy finish.
6. Jewelry Holder
A teacup jewelry holder is simple, useful, and ideal for rings, earrings, and little everyday pieces. If your dresser needs a bit of order, this one helps fast.
Basic supplies needed
- Teacups (various sizes)
- Saucers/plates (various sizes)
- Strong glue
Simple step-by-step directions
- Wash and dry the teacups and saucers.
- Glue the teacup upside down to the center of the saucer. Repeat to build a tower adding another saucer and teacup. It is best to have the larger teacups and saucers at the bottom. The finally teacup at the top should be facing upward.
- Place it on your vanity, dresser, or bathroom counter.
- Fill it with rings, earrings, bracelets, or hairpins.
Make-it-extra tip
Stack a teacup on a saucer beside a matching plate for a layered jewelry station that looks elegant and tidy.
7. Teacup Wind Chime
Now we move from tabletop charm to something that sings in the breeze. A teacup wind chime has movement, sound, and lots of personality.
Basic supplies needed
- Teacup
- Saucer
- Drill with ceramic bit
- Twine, fishing line, or chain
- Beads, charms, or old spoons
- Hanging ring
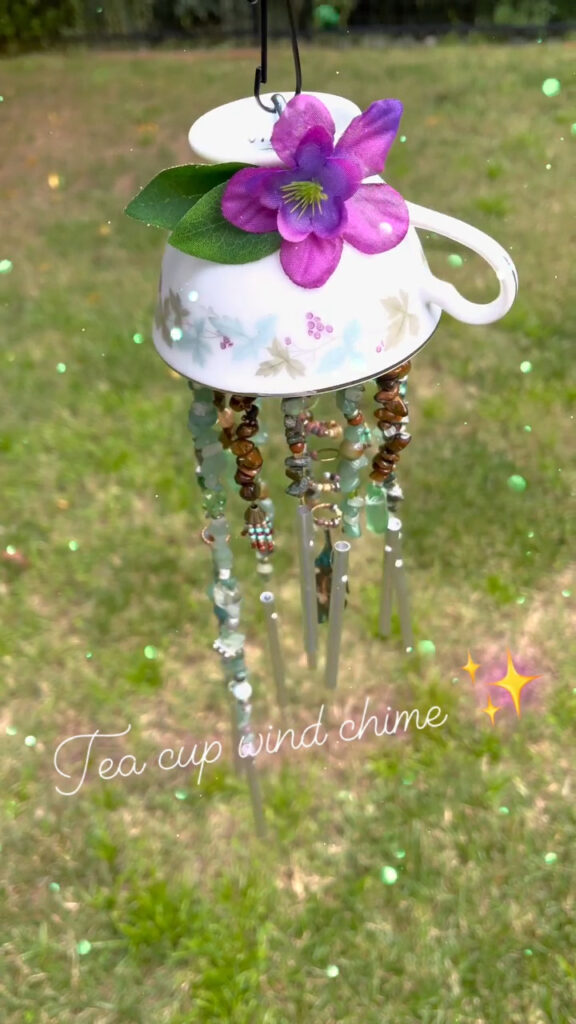
Simple step-by-step directions
- Carefully drill small holes in the teacup and saucer.
- Thread twine or chain through the holes.
- Add beads, charms, or spoon pieces as hanging elements.
- Tie everything securely to a hanging ring.
- Hang it on a porch or patio.
Make-it-extra tip
Mix crystal beads with floral china for a soft, sparkly look that catches both light and attention.
8. Tea Party Centerpiece
If you’re hosting brunch, a shower, or a spring gathering, this idea of using teacups as a centerpiece is a lovely one. It feels thoughtful without being fussy.
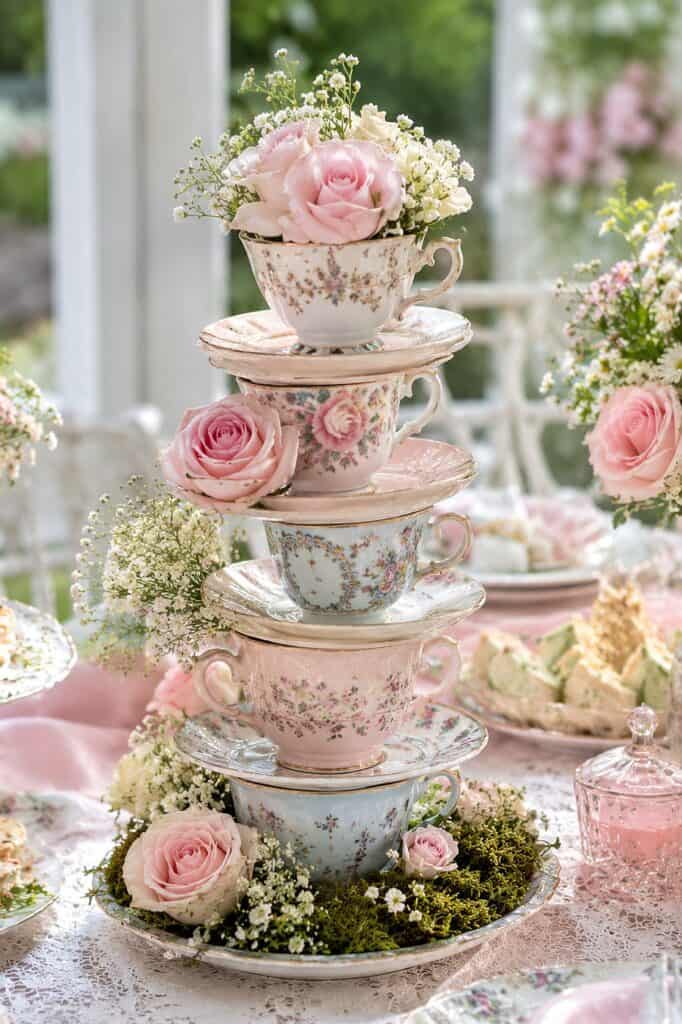
Basic supplies needed
- Several teacups
- Fresh or faux flowers
- Candles, optional
- Tray or cake stand
- Moss or greenery, optional
Simple step-by-step directions
- Gather teacups in different sizes or patterns.
- Fill each with flowers, greenery, or small candles.
- Arrange them on a tray, runner, or cake stand.
- Add a few extra touches like moss or petals.
- Place the display in the center of your table.
Make-it-extra tip
Mix mismatched cups in the same color family to create a collected look that feels styled but relaxed.
9. Teacup Flower Arrangement
This is one of the most versatile teacup gift ideas on the list. It works for birthdays, Mother’s Day, thank-you gifts, or just brightening a corner of your home.
Basic supplies needed
- Teacup
- Fresh flowers or faux stems
- Floral foam or water
- Floral snips
Simple step-by-step directions
- Place floral foam inside the cup, or fill with water for fresh flowers.
- Trim your flower stems short.
- Start with greenery, then add focal flowers.
- Fill in gaps with smaller blooms.
- Turn the cup as you work so it looks balanced from all sides.
Make-it-extra tip
A single rose with a few filler flowers can look just as beautiful as a full arrangement, especially in smaller vintage cups.
10. Teacup Lamp
This craft takes a little more effort, but the finished piece has so much charm. If you love cottage-style or romantic teacup decor, this one is a standout.
Basic supplies needed
- Teacup
- Lamp kit
- Drill with ceramic bit
- Strong adhesive if needed
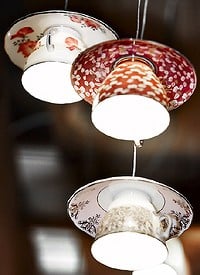
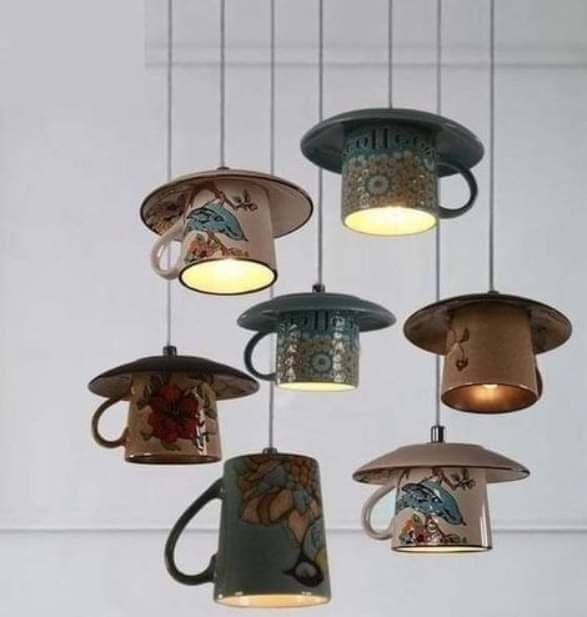
Simple step-by-step directions
- Mark where the cord and hardware need to go.
- Carefully drill the needed hole.
- Install the lamp kit according to package directions.
- Secure the teacup as part of the lamp base.
- Add the bulb and shade, then test it.
Make-it-extra tip
Use a petite pleated shade for an extra vintage feel. It makes the lamp look charming rather than overly crafty.
11. Teacup Ornaments
If you decorate for the holidays or simply enjoy seasonal crafts, tiny teacup ornaments are delightful. They’re light, sweet, and easy to personalize.
Basic supplies needed
- Small teacups or miniature cups
- Ribbon or twine
- Paint (optional)
- Faux snow, bell, greenery, or mini decorations
- Strong glue
Simple step-by-step directions
- Clean the cups and decide how you want to decorate them.
- Glue small festive details inside or around the rim. If you want a background color you can paint the inside of the cup.
- Attach ribbon or twine for hanging.
- Let everything dry fully.
- Hang on a tree, wreath, or hook.
Make-it-extra tip
Write the year on the bottom for a keepsake ornament that feels personal and giftable.
12. Mini Teacup Diorama
This is one of the most creative DIY teacup ideas if you love little scenes and storytelling. It’s part craft, part decor, and a lot of fun.
Basic supplies needed
- Teacup
- Moss, paper, or fabric scraps
- Mini figures or tiny objects
- Glue
- Scissors
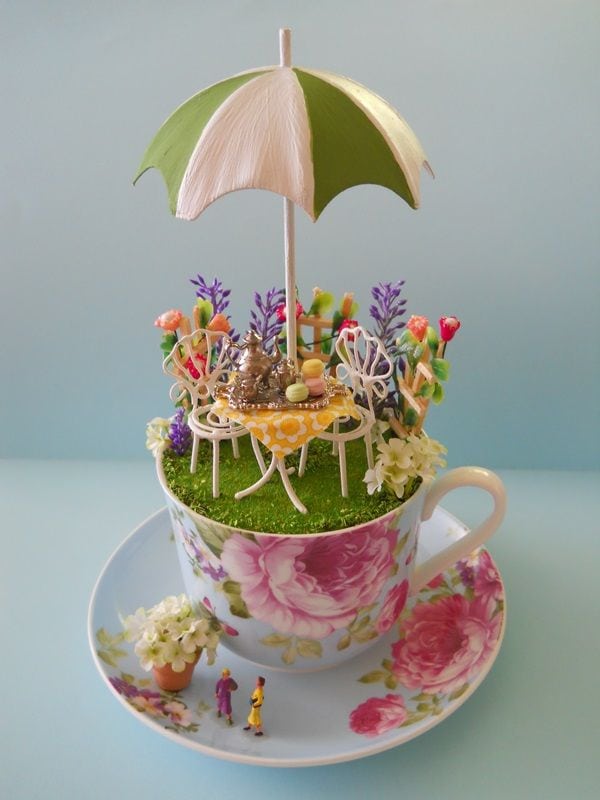
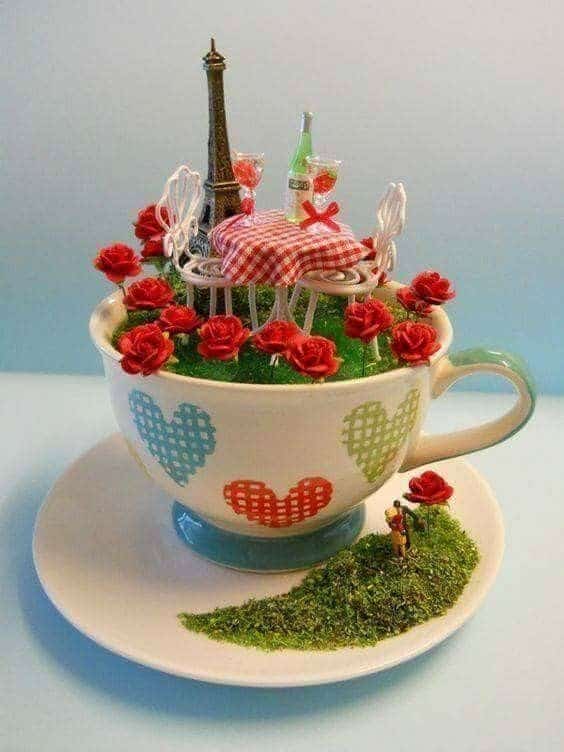
Simple step-by-step directions
- Choose a theme, like a tiny library, garden, or woodland scene.
- Create a base inside the cup using moss or fabric.
- Add miniature objects and glue them into place.
- Layer details from back to front.
- Set it on a shelf where people can enjoy the tiny scene up close.
Make-it-extra tip
Pick one clear theme so the diorama feels charming instead of cluttered.
13. Teacup Soap Dish
Sometimes the simplest upcycled teacup projects are the ones you use every day. A teacup soap dish adds a pretty touch to a bathroom or kitchen sink.
Basic supplies needed
- Shallow teacup or teacup saucer
- Bar soap
- Strong Glue
Simple step-by-step directions
- Clean the teacup or saucer thoroughly.
- Place the saucer on top of the teacup and glue it.
- Place your soap on the top of the saucer.
- Set it beside the sink or tub.
Make-it-extra tip
Pair the dish with a wrapped bar of handmade soap for a lovely guest bathroom accent or hostess gift.
14. Painted Teacup Art
If you’ve got chipped cups that are no longer food-safe, or some plain teacips painting them is a great way to turn them into display pieces. This is where you can really make your style shine.
Basic supplies needed
- Old teacup or teacups that are a solid color
- Acrylic paint or paint pens
- Small brushes
- Sealer for decorative use
- Paper towels
Simple step-by-step directions
- Wipe the teacup clean and dry.
- Sketch your design lightly if needed.
- Paint flowers, dots, stripes, or simple shapes.
- Let it dry completely.
- Seal it if you plan to use it as decorative display only.
Make-it-extra tip
Paint the inside a contrasting color for a fun surprise that makes the cup stand out on a shelf.
15. Teacup Dessert Cups
Not every teacup project has to be permanent. Teacup dessert cups are perfect for parties, showers, and holiday tables, and they always get compliments. Such a cute way to use your teacups!
Basic supplies needed
- Clean teacups
- Pudding, mousse, cheesecake filling, or trifle layers
- Spoon
- Berries, mint, or sprinkles for topping
Simple step-by-step directions
- Wash and dry the teacups.
- Spoon in your dessert layers.
- Smooth the tops.
- Add fruit, whipped cream, or other toppings.
- Chill until serving time.
Make-it-extra tip
Use mismatched china for a tea-party look that feels playful, elegant, and very photo-friendly.
Tips for Choosing Teacups for Crafting
Before you start making these teacup crafts, it helps to know what kinds of cups work best.
- Look for thrifted, chipped, mismatched, or single teacups
- Choose sturdy cups for drilled projects
- Save delicate cups for display-only crafts
- Wash everything well before starting
- Keep saucers too, since they’re useful for planters, feeders, and centerpieces
Some of my favorite vintage teacup crafts come from pieces that weren’t perfect to begin with. A tiny crack, faded flowers, or a missing pair can actually make the finished project feel more charming.
Give Old Teacups a Beautiful Second Life
One of the nicest things about these DIY teacup ideas is that they turn forgotten pieces into something useful, decorative, or gift-worthy. A teacup that might have ended up in a donation box or worse can become a candle, planter, centerpiece, or sweet little keepsake.
So before you throw away old china, take a second look. These upcycled teacup projects prove that even the smallest vintage find can become lovely teacup decor with just a bit of creativity. Pick one idea, gather a few supplies, and make something charming this weekend.